|
||||||||||||||||||||||||||||||||||||||||||||||||||||||||||||||||||||||||||||||||||||||||
|
The Labs |
||||||||||||||||||||||||||||||||||||||||||||||||||||||||||||||||||||||||||||||||||||||||
|
Lab 1 Gnalbs Min Lvl10 Lab 2 Killing the Demon Lords Min Lvl12 Lab 3 Killing the Immortal Master Min Lvl15 Lab 4 Underwater World Min Lvl20 Lab 5 Undead Min Lvl25 |
||||||||||||||||||||||||||||||||||||||||||||||||||||||||||||||||||||||||||||||||||||||||
|
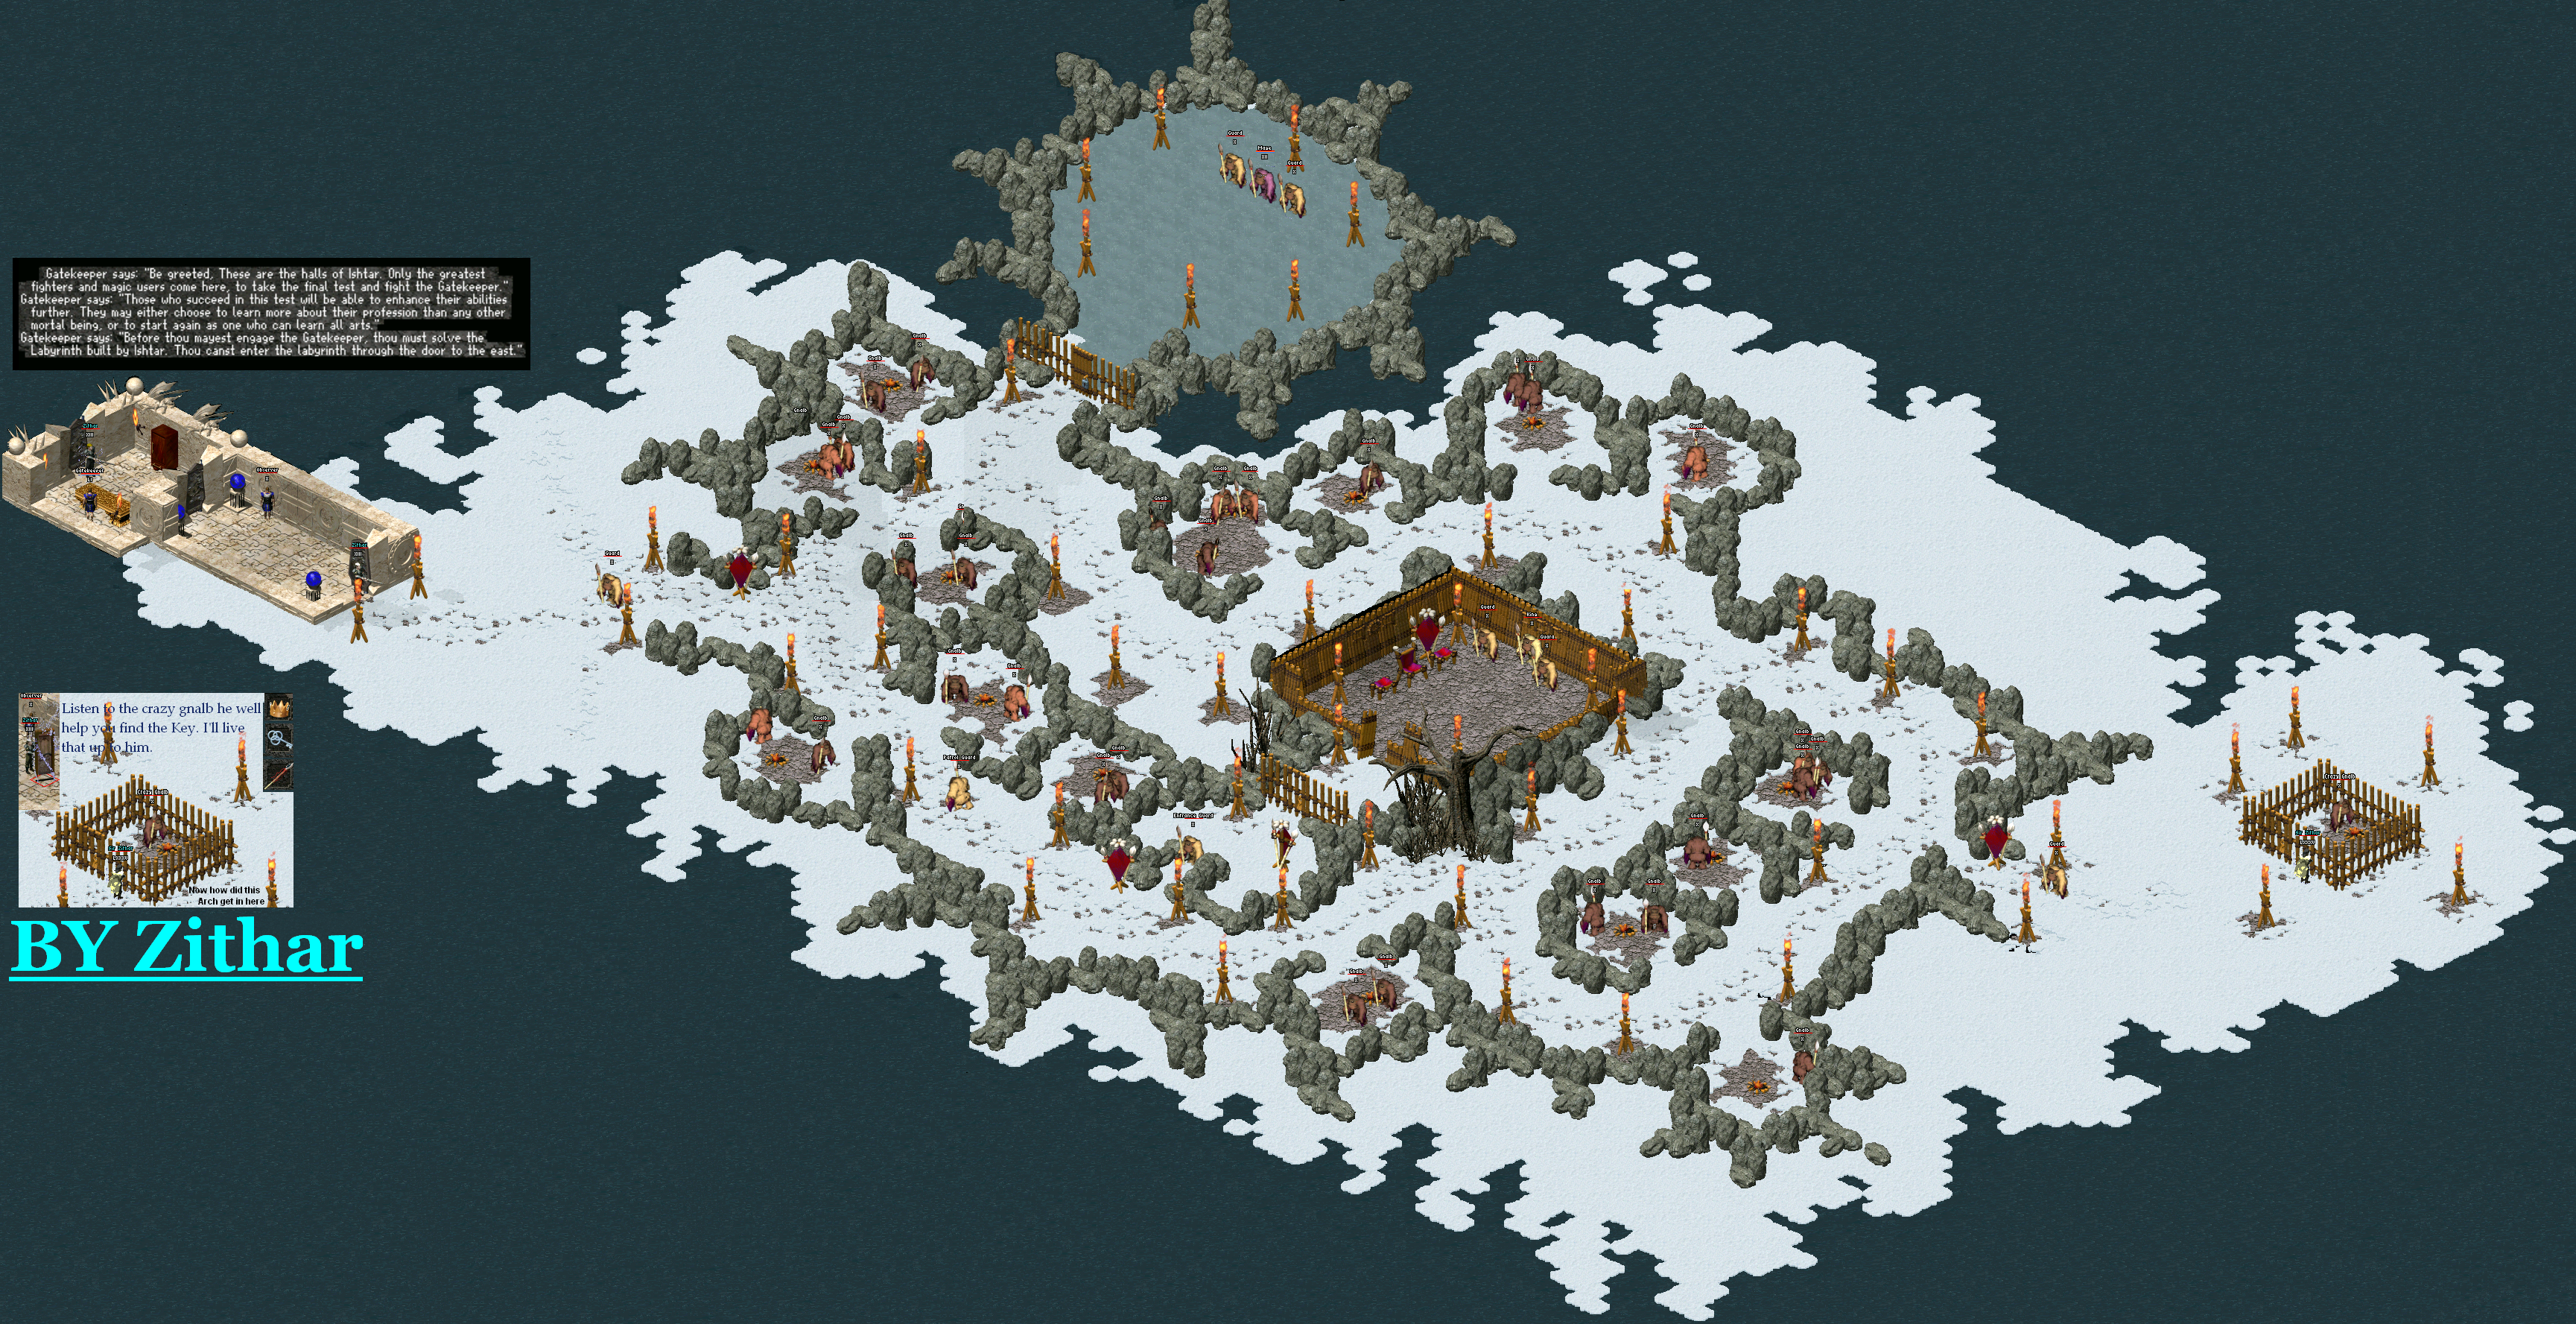
LABYRINTH 1 - "GNALBS"
Min lvl 10 Enter the labyrinth, the Observer will greet you... "To the east is an entrance to the Gnalbs winter residence. The Gnalbs are peaceful creatures, but their King and their Mage and the Guards are not. Bring me the Kings crown, the Mages Scepter to prove thou art worthy to enter the next lab." The Gnalb are around level 10. Do not attack Gnalbs AVOID Guards, Use Stealth mode What to do: Go to Gnalb King's Hut in center of area (79,207) and get Crown. Then find Crazy Gnalb (117,191) to get hint on Mage Key. Get Key from fire (71,188) north of Kings hut. Proceed to Gnalb Mage House (39,185) at first steps (46,203) and unlock door with key. Get Scepter. Now return to the Observer and give him the crown and the scepter, then he will open a magical gate, use it and move on to the next lab. |
||||||||||||||||||||||||||||||||||||||||||||||||||||||||||||||||||||||||||||||||||||||||
| ||||||||||||||||||||||||||||||||||||||||||||||||||||||||||||||||||||||||||||||||||||||||
|
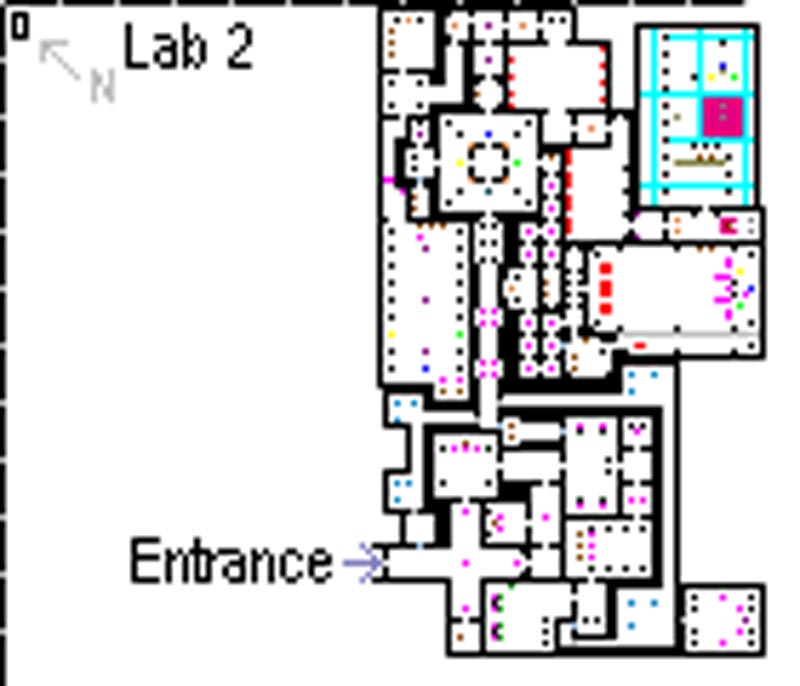
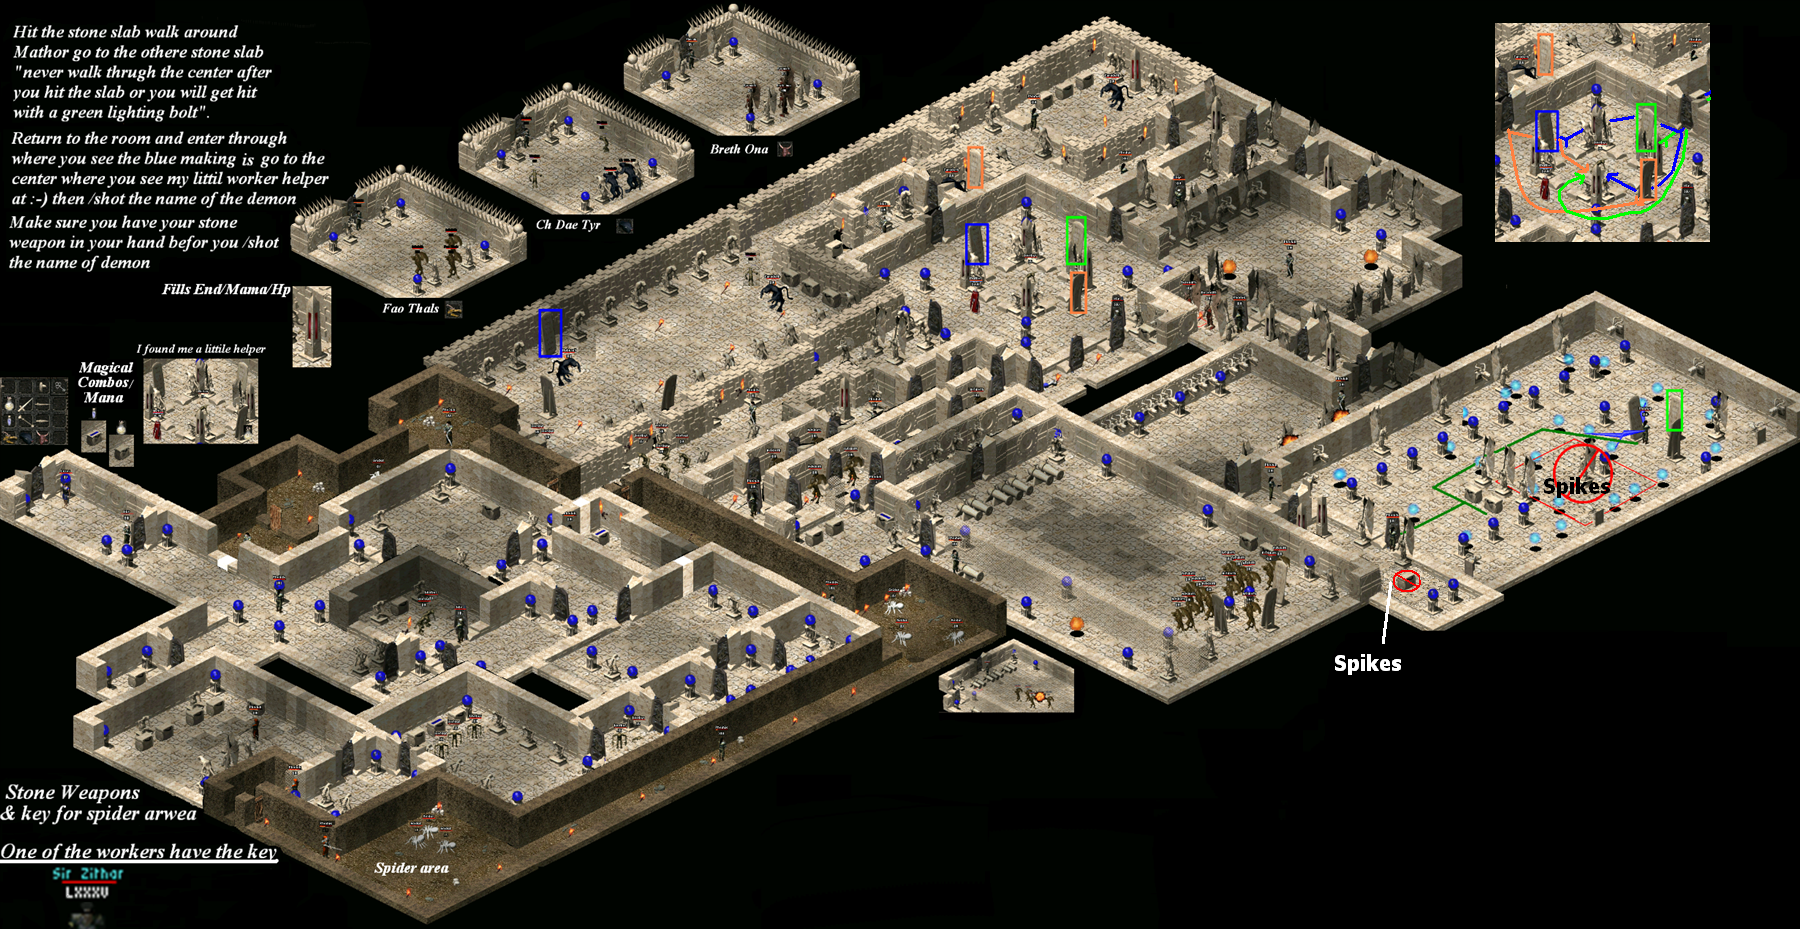
LABYRINTH 2 - "THE DEMON LORDS" Min lvl 12
|
||||||||||||||||||||||||||||||||||||||||||||||||||||||||||||||||||||||||||||||||||||||||
|
||||||||||||||||||||||||||||||||||||||||||||||||||||||||||||||||||||||||||||||||||||||||
|
What to do: The first goal is to find a stone weapon to fit your class. Go Southeast , Northeast, Southeast and then Southwest and you will come to a room with four chests, they contain a stone sword, staff, dagger and a two handed sword. In this room is also a magic using monster with a key to the secret door within a wall at the beginning. Spiders are much easier to kill than workers, useful shortcut once you have the key. The purpose of the stone weapon is it's the only thing that can kill the Demon Lords. Your next goal is to find the main room with a mage, tall obelisks and slabs of stone. Once there talk to the mage, and listen VERY carefully. Basically you need to find the true names of the three Demon Lords in order to enter their chambers. The easiest one is the door on your left, touch the slab on the right first. Then the ritual begins. Enter the door to your left. turn right, kill monster, touch the slab to get Demon Lords true name. Turn around and go back to the main room. Enter the obelisk square from side opposite obelisk you touched Stand exactly in the middle of the obelisks, in the middle space. Then SHOUT the Demon Lords true name, you will be teleported into his chamber. Kill him, take his head. On to the next ritual. The next two rituals are harder. Remember, if you touch the wrong slab within the mazes, the ritual will end. You will then have to touch the appropriate slab in the room with the obelisks to start over again. The good news is that once you kill a Demon Lord he will stay dead unless you leave the lab. If you come to get your body, the heads will still be on your corpse. The second step is to touch the slab to the left. Go through the center door at the top of the room. When you get to the crossway go left. Go to the end and touch the correct slab. If you don't, you will have to go back and touch the right slab in the obelisks room again and restart the ritual. Go to the main room after you get the second Demon Lords true name and repeat the process to enter his chamber and kill him. The third step is to touch the slab at the top of the main room. Go through the door at the top again. When you get to the crossway, this time go right. You will go through a couple rooms with magic being fired off. Proceed until you reach a room with a chest. Don't touch it. It is surrounded by spikes. And they hurt! Go through the final door and enter a room filled with lightning balls. Look where the lightning balls go, there are Safe spots in between each square wait till they stop, run to safe spot, wait till the go again and stop, run to next safe spot. Go up and around to the left to reach the slabs. There are three places in LB Trap Room where the LB will not reach you, a short strip in front of chests a single square to left of Spike Trap area, and the single square immediately in front of the Central Tablet ( Blue ) By timing the breaks in LB's you can get in and out without getting hit at all. (you must be 3 sq away from LB path) Watch out there are spikes in this room as well. When you get the final Demon Lords true name, leave and go back to the main room. Perform the moves to enter the Demon Lords chamber. When you have defeated all three Demon Lords, give the three heads to Laros in the beginning of the labyrinth. A magical gate will appear, enter to proceed to the next lab. |
||||||||||||||||||||||||||||||||||||||||||||||||||||||||||||||||||||||||||||||||||||||||
|
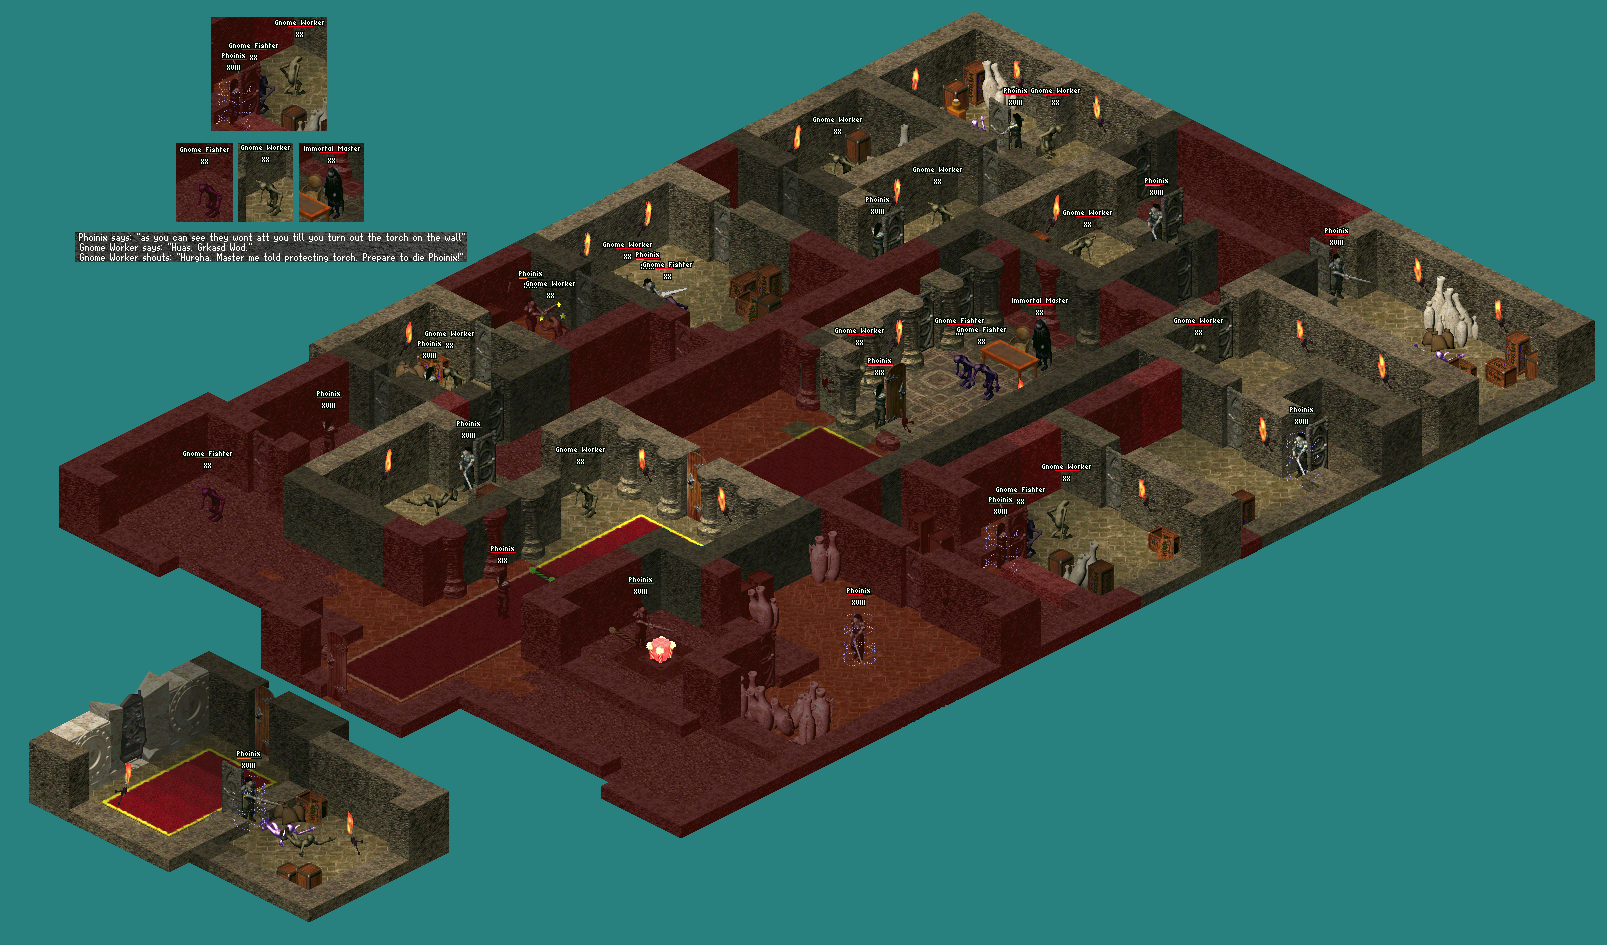
LABYRINTH 3 - "THE
IMMORTAL MASTER"
Min lvl 15
Main Objective:
The Dark Gray areas ■ are Permanently Dark use an Infravision Potion to see there. The Light Gray areas ■ are rooms you will have to Make Dark in order to carry the Death Fibrin Staff through them. Kill the workers and put out the torches, work quickly. White rooms should be avoided as they serve no purpose other than to get you killed. The Deathfibrin Staff ■ is on a pedestal at 245,236 The immortal Master ■ is in his chambers at 239,213
What to do: |
||||||||||||||||||||||||||||||||||||||||||||||||||||||||||||||||||||||||||||||||||||||||
|
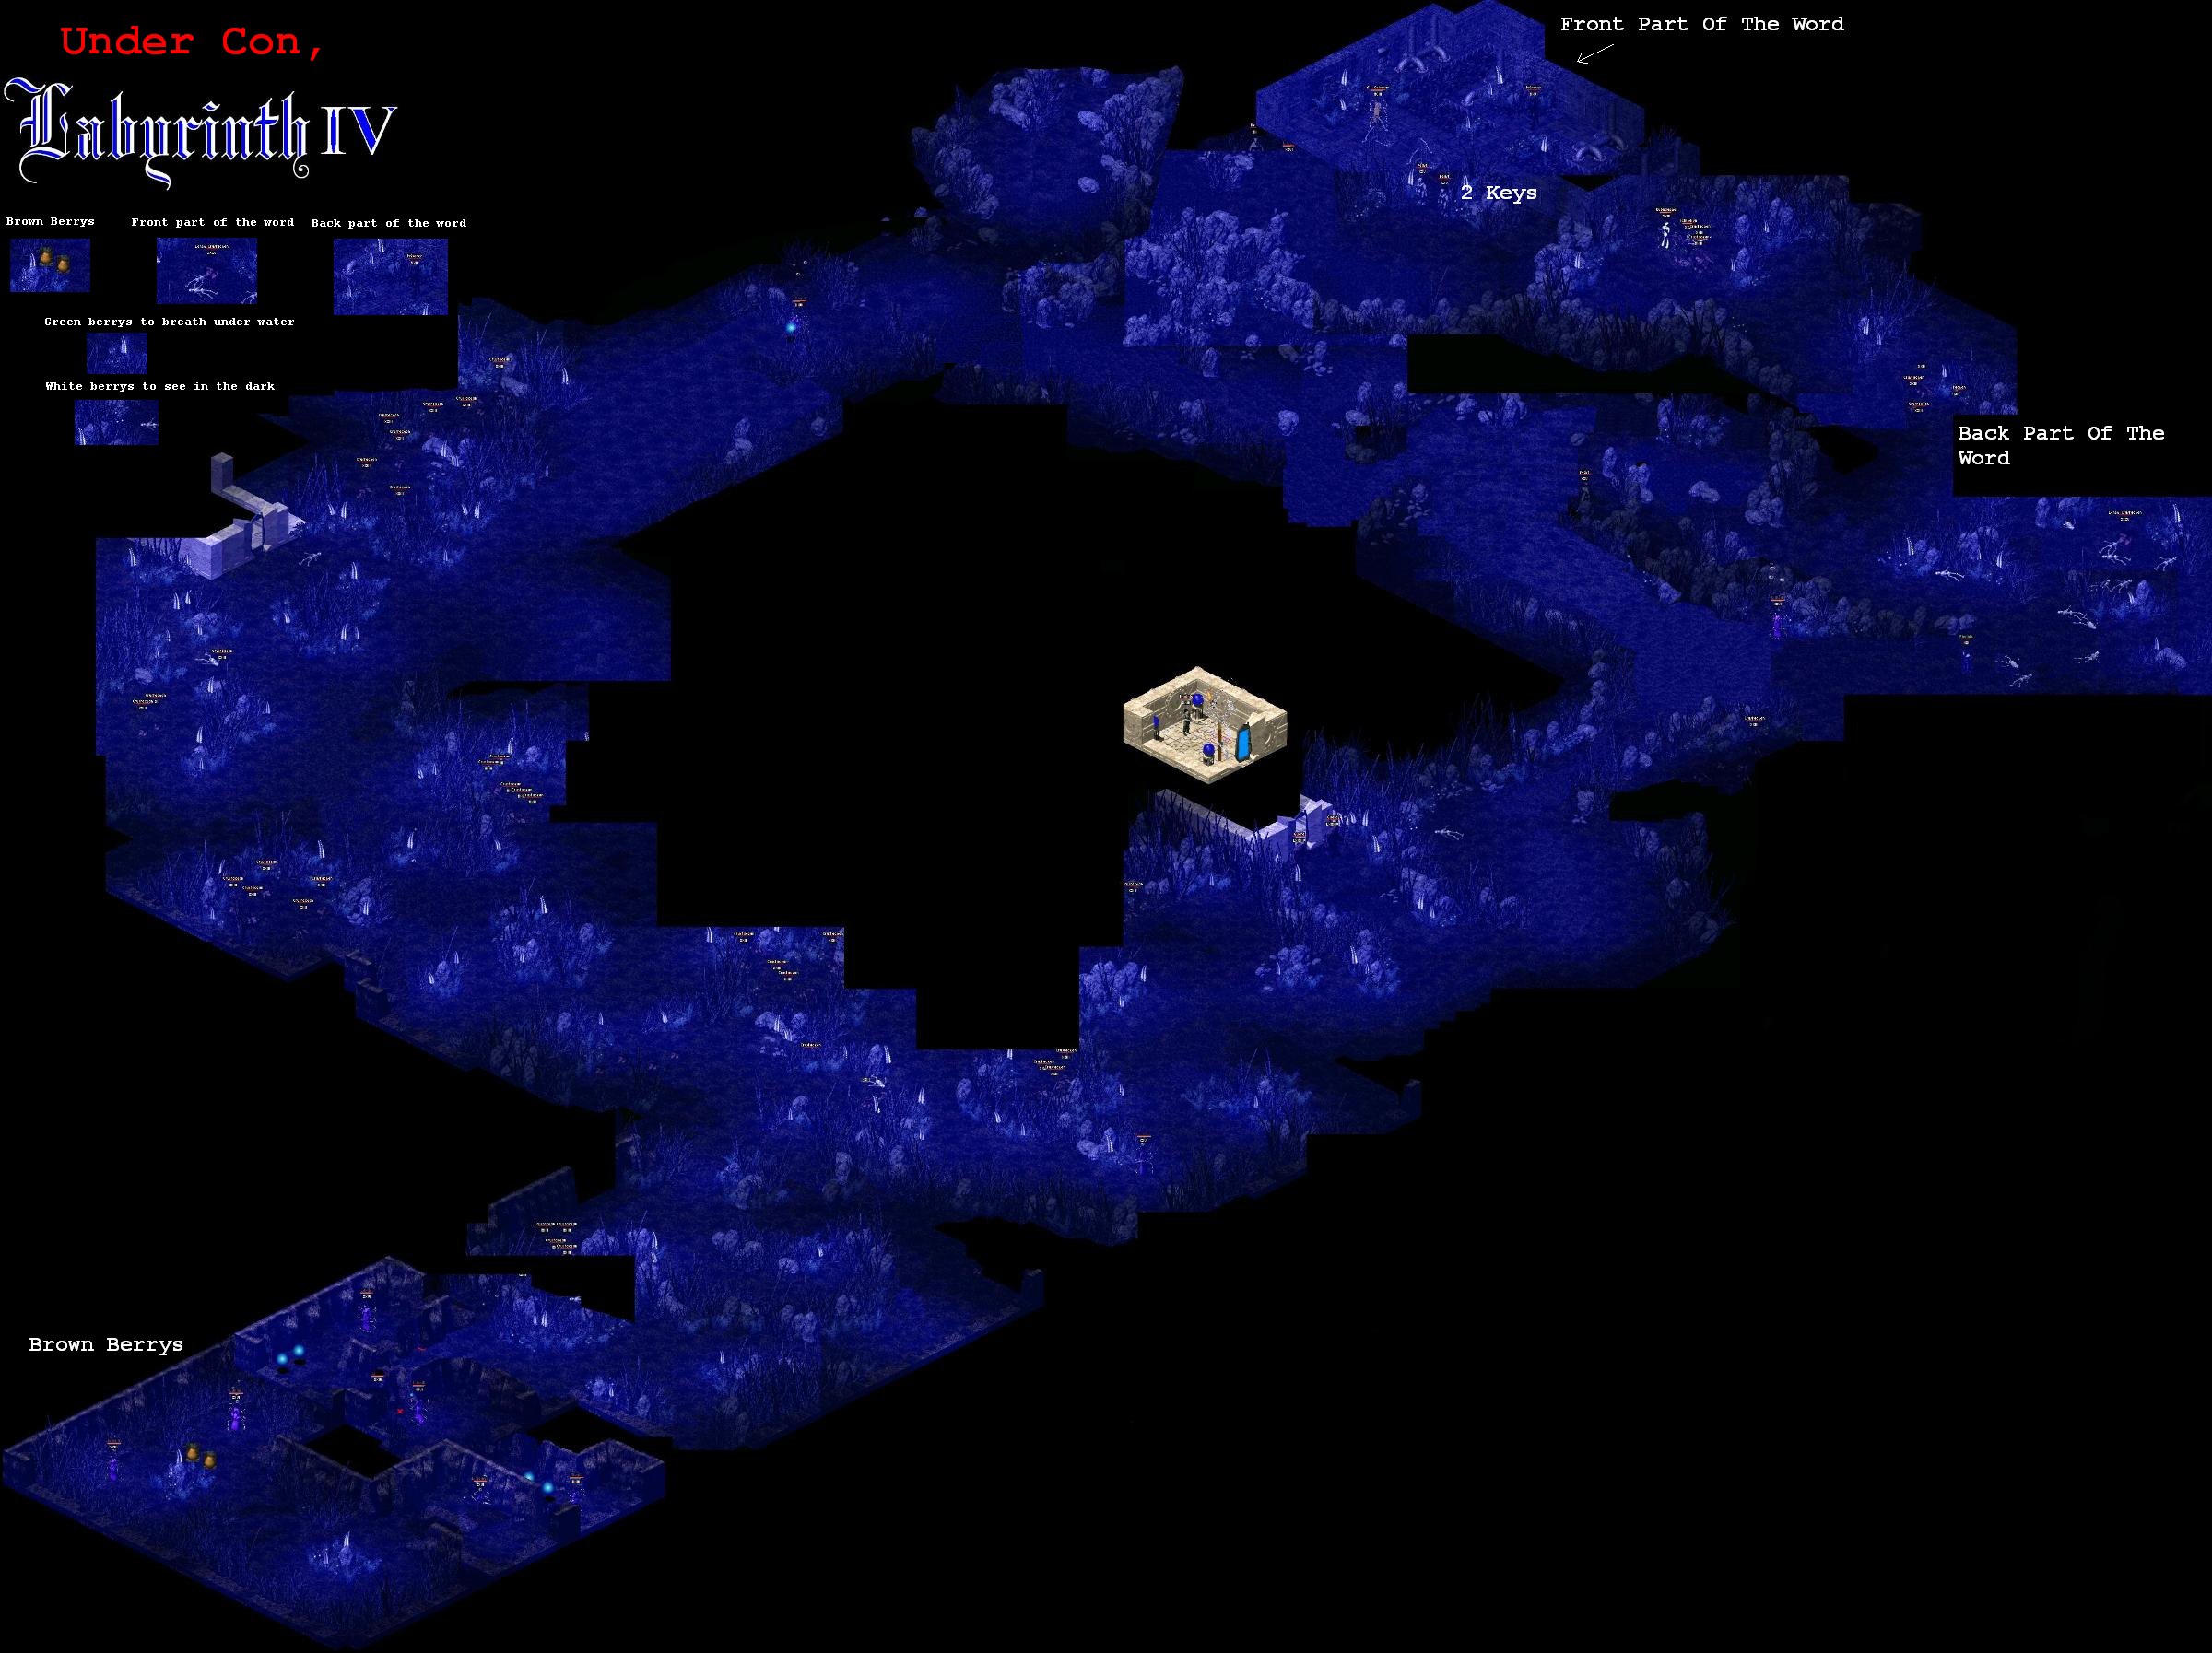
LABYRINTH 4 - "UNDERWATER WORLD" Min lvl 20 (Warning you cannot lag out in Lab 4 you will drown in one minute, make sure your lag settings allow the use of a recall scroll)
Main objectives:
White Berries - Cause you to give off light. to see in dark areas, Eat Brown pear just when you need to say the password. Go into the guarded building and use the solve door.
Thanks to Chronoxero for this map. Remember the Top Right Corner of this map is North... the top of your screen Co-ordinates are approximate Entrance is 153,103 Skellie Password Hint 234,20 Prisoner Password Hint 188,29 Exit 229,84 Pear Room Entrance... Skellie Password Hint 234,20 Pears... 231,189 232,189
Looking at the map one could also do the prisoner first, then the pear and last the crustacean before exiting
What to do:
Look for an area where there is a skeleton laying on the floor guarded by a Huge Crustacean LVL 35. This skeleton has the second half of your password. Don't fight this creature unless you are very strong.. Just lure him away and run to the skeleton and grab the password. Then get out of there. If the other half of the password is ...CAKES, then your password will be PANCAKES... write it down in case you have to scroll out, the notes will disappear but your password will still work (Password is different for each character, and also changes when you seyan ).
Now leave this
area going back through the dark area. Go south east.
|
||||||||||||||||||||||||||||||||||||||||||||||||||||||||||||||||||||||||||||||||||||||||
Passwords:
| ||||||||||||||||||||||||||||||||||||||||||||||||||||||||||||||||||||||||||||||||||||||||
|
LABYRINTH 5 - "UNDEAD"
Min lvl 25 (In several places you can be mobbed by Undead, Be sure you are strong enough to survive while you dish out the Holy Water)
What to do: Go South West through library rooms avoiding the rooms with multiple Undead, and read the Books you find open on tables, there are 4, giving directions to graves hiding the 4 pieces of clothing. ( Hat, Cape, Belt & Boots ) Write them down, if you have to recall and reenter the lab they are the same. They are however different for each player doing the lab. Find graves, (Yellow row is first row, fully yellow grave is grave 1) kill Undead with Holy Water and collect the four items of clothing from the Undead corpses. Restock on Holy Water at this point (get 20 bowls) Equip black clothing as a disguise and head North East behind Chapel to Crypt door. Inside is a NO MAGIC ZONE. (You will be very weak and cannot kill undead with Holy Water.) A Lvl 102 demon ( He's short sighted and mistakes you for his master) will appear, and start talking, listen, do not attack. When he has finished he will disappear and you can proceed
ONCE INSIDE YOU CAN REEQUIP YOUR NORMAL
ITEMS JUST BE CAREFUL TO PUT ON BLACK
CLOTHING AGAIN BEFORE TRYING TO LEAVE CRYPT Take ring back to NPC (Herald) by shrine that made holy Water, He will congratulate you and open a magic portal, use it and you are done with lab 5. |
||||||||||||||||||||||||||||||||||||||||||||||||||||||||||||||||||||||||||||||||||||||||
|
THE GATEKEEPER Turn auto bless off and wait till your bless runs out, then challenge the gatekeeper, once in anteroom bless yourself and enter . There is a certain amount of randomness in the GK fight so try again if you narrowly lose |
||||||||||||||||||||||||||||||||||||||||||||||||||||||||||||||||||||||||||||||||||||||||
| Last Edited Monday, December 07, 2009 08:21:12 PM | ||||||||||||||||||||||||||||||||||||||||||||||||||||||||||||||||||||||||||||||||||||||||